Critter Pumpkins Craft!
- Bethanie Garcia

- Oct 10, 2019
- 3 min read
Okay, before we start the most adorable Fall craft post you will ever see... I have a giveaway winner to announce! I've already reached out to her via email, but *drum roll pleeeeeeease*....... the winner is GINA M!!! Congratulations, and prepare for the best Frozen 2 swag ever!!!
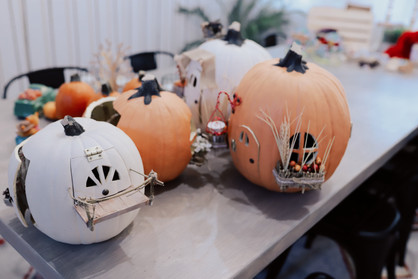
And now... Check out this cuteness!!

I originally saw the idea here to use craft pumpkins as houses for Calico Critters, and saved it to do with my kids. (We bought Li'l Woodzeez though because I found some on clearance at Target, haha!) I showed Nephi, and he was so excited about the idea that he wanted to join us in making them, which of course took it to Designer Daddy level!!! ;)
But before sharing more of these photos of the end result, let's start with the process!
There were A LOT of little details, so I will go over the things that we took photos of, but feel free to comment below if you see something that you're not sure how to make, that I didn't cover here, and I will let you know what it's made of and how we did it! We found everything at Jo-Ann's, Amazon, Walmart, Target, Dollar Tree, and... I think that's it! ;) I know you can also get the carvable pumpkins at Michael's or Hobby Lobby!
First, we drew with pencil where we wanted to cut, and then cut giant rectangles on one side of the pumpkin for access in play, and on the other side were windows and doors! The easiest way for us was to use an X-Acto knife. We erased the leftover pencil lines after we were done drawing it on.
Leo brushed the dust out of the pumpkin with a big, dry brush afterwards. I was actually surprised how much dust comes out after carving them!
Lili opened all of our Li'l Woodzeez critters out of their packages while the boys started painting furniture. (side note: They come with little story books, and they are so cute!) The wooden chairs you see in these photos below are from a doll set we already had, but all of the other furniture was made out of popsicle sticks, buttons, twigs, cardboard, etc. which you'll see later! Use your creativity!
The little animals are so soft and cute and tiny and fun to play with!!!
As far as painting goes, we used different acrylic paints, and diluted them with water to create a kind of wood stain! (Don't forget to be careful, because it will stain your clothes! It came off of our tables very easily though.)
This was the kids' favorite part! In fact, while we've had the paints out for the last week while working on these, they have given makeovers to tons of their toys and their Halloween candy baskets too! Haha! It's been messy, but I looooove seeing them be creative, and I secretly love the paint smudges all over their faces, arms, and hands. :) For the flooring in the pumpkins, we used a cardboard base and popsicle sticks to create "wood floors". Those were stained as well, and then the walls of the pumpkins painted to look like wallpaper! (I don't think you'll see the "wallpaper" in a photo until the ones taken outside at the very end...)
Eddy and I started choosing and cutting ribbons and fabric for curtains, blankets, pillows, scarves, etc... Side note, the little table and chairs you see were made using toilet paper rolls cut down to the right height size and wrapped around with twine. How genius is that?? Nephi's idea, of course! ;)
We used tacks to hang little LED lights around the roof of each pumpkin, and also attached all the doors and big pumpkin openings with tacks and hinges. To keep these safe for kids, make sure you put a drop of hot glue on the other side of the tack or screw if it pushes all the way through the pumpkin!
I also found some little "gratitude trees" at Target that I wanted to arrange around the pumpkins, and then I figured we could use them for November to write down what we're thankful for on the leaves! I'm obsessed with every detail of this project, haha.
Okay, so again, let me know in the comments if there is anything you see above or below that I didn't cover yet, if you want to know what it's made of or how we made it! All of this turned out so cute, and making it with the kids was so much fun!
I cannot wait to be able to get these out every year at the start of the holiday season for the kids to play with, especially with all of the memories of making them together!
Leo was really done taking photos by the end of this, haha... Anyways, let me know if you make this too, and Happy Crafting!
Love, Beth


This is the CUTEST thing ever! I love all the creativity behind it. As an interior designer it totally makes me want to make one just for fun.
Thank you so much for sharing!